Start with the essential items: Logitech QuickCam Pro, USB extension cable, weatherproof flashlight (see below), silicone caulking w/ gun, 4 5/8 inch round piece of glass, flat black spray paint, and fiberglass pipe wrap (3 inches wide, etc.), 1/2 inch shrink tubing (for waterproofing the splices).

Here's how to start.......
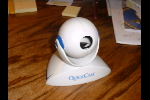
Step #1: Take the Logitech QuickCam Pro and unplug it!!!!
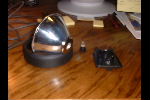
Step #2: On the back of the camera ball you'll notice a small hole. This hole will guide a very fine pin or piece of wire inside to the tabs that lock the sides of the case together. It may take some prying. Using the slot around the outside of the case, pry it apart. The tripod mounting adapter will fall out, along with the guts of the camera. No biggie!!
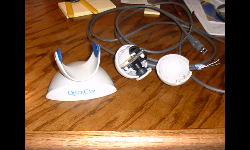
Step #3: Cut the QuickCam Pro USB cable several inches from the plug. You can discard the plug, since you'll use the USB extension cable plug!
Step #4: Keep the lens and internal camera parts clean, place them in a ziplock bag until ready.
Step #5: Take the extension cable (I used a Belkin Pro cable) cut the end off of the "A" side (if using a A to A cable), or the "B" side (if using a A to B cable). Save until later.
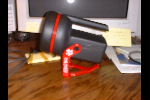
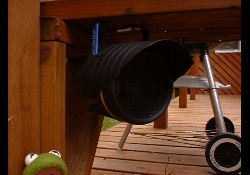
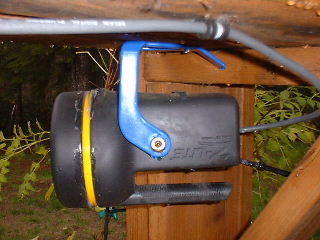
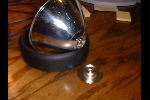
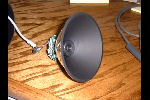
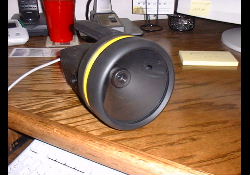
Step #6: The flashlight, the most important part! I used the Lumilite Z-Lite flashlight (Kmart for $12), because it has a built in stand, which I turned into the mounting bracket with no modifications (except drilling holes for mounting). The works perfect, I say again perfect, for the QuickCam lens. It couldn't have been made any better for mounting the camera lens, you just end up with a 6 volt battery you'll never use?!?!. The diameter of the light bulb hole is exactly the same as the lens screw adapter.
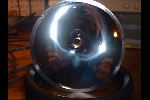
First, unscrew the cap from the flashlight, removing the cheap, distorted plastic lens and gasket. This pulls out the reflective lens and light bulb adapter. Remove the black battery post adapter from the back of the lens by pressing on the tab to release it. Unscrew the cap holding the light bulb, remove it and the bulb. Grab the metal bulb insert on the plastic reflector and carefully pull and pry it off. You can now throw the metal piece away. Drill a 3/8 inch hole towards the side of the reflector (keeps the lens from fogging up, and the heat from the camera circuit boards will rid the flashlight housing from moisture). Using flat black spray paint, paint the inside of the reflector area, otherwise the reflective coating may produce too much reflection for the QuickCam Pro lens. You may also want to spray paint the white area of the QuickCam Pro lens (I did because it reflects against the glass lens, and you will notice it in the picture). Throw away the plastic lens after you've made a glass copy. Going to your local glass company or Home Depot/Lowe's/Eagle/Home Base, have a piece of thin glass cut the exact size of the plastic lens (4 5/8 inches round).
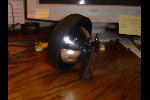
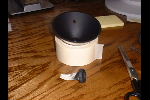
Step #7: Using a 7/16 inch drill bit, drill a hole in the back or bottom of the flashlight housing for the camera USB cable. Pull one end of the USB cable throught the hole and keep dry and clean. You'll be splicing this later. Place enough of the fiberglass pipe wrap inside the flashlight case to keep the unit from freezing during the winter months (and probably helping it during the summer also??)
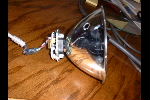
Remove the camera from the ziplock bag and unscrew the camera lens, avoiding all posible dirt and dust from touching the internal camera parts. Place the camera parts through the hole in the flashlight lens, and screw in the camera lens. It should fit perfectly.
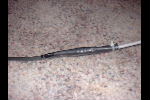
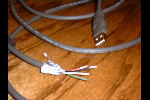
It's now time to start splicing. Cutting the outer jackets from both the camera cable and the extension cable using a razor blade or cable stripper, avoid cutting the shield inside the cable. On the camera cable you will see 4 conductors, one foil shield, and the braided shield. Slide the shrink wrap tubing on the cable. Spread the wires so you can see each color. Strip the insulation, from each color and twist them together, color by color, applying solder over the connections. I used black rubber insulating tape cut in 1/2 inch pieces and wrapped the connections one by one. Once all the splices are completed, take a small piece of aluminum foil, and wrap the spliced area ensuring the shield from the two cables touch the foil. Tie the braided shields together and attempt to strech it over the foil. Pull the shrink wrap tubing over the spliced area, and heat. I also used small cable ties to seal the ends of the shrink tubing. It's tedious!!!!
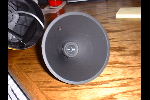
Step #8: Plug in the camera to your PC, and start the QuickPict software. Now for the fun part! Either yourself or with help from someone, adjust the lens for focus, then for straightness. MAKE A MARK somewhere on the painted area of the flashlight lens where the straight center is. Install the glass lens and gasket, install lens cover. NOW TEST AGAIN for focus, and straightness. If this is all set, use the silicone caulk (I used GE Silicone II caulk) and apply around the lens screw on cover, and around the glass for the lens (outside of the flashlight), and where the cable enters the flashlight housing. You should be set.
With the built in bracket on the Z-Lite flashlight housing, pop the two screw covers off the bracket using a small screwdriver, remove the phillips screws, and remove the spring and plastic tensioner from the housing. Drill holes wherever on the bracket and mount the bracket in the camera direction you desire. Remount the flashlight housing, springs, plastic pieces, and screws.
You are basically done! 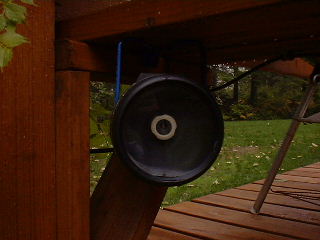
I did alot of research on different camera housings, and cable lengths (Logitech recommends only 15 feet max), but it can handle longer lengths. Apply some Rain-X on the glass lens to keep the dirt and rain from collecting on the glass. Enjoy! If you need any assistance please contact me at "weathercam@rlandon.com".
Updated 4/23/2000